

Introduction to Knots
If you're interested in jewellery making or simply want to create adjustable, stylish accessories, learning how to tie a sliding knot is an essential skill. Talking about sliding knots, this versatile knot offers a secure and adjustable closure for necklaces or cords without the need for a clasp. In jewellery making, sliding knots are a popular and practical finishing technique that eliminates the need for a metal clasp. This technique is particularly favored for leather or satin cords, providing both functionality and a sleek, minimalist look. The sliding knot can be used to create adjustable lengths for necklaces and bracelets, making it a highly versatile choice for various designs. With this easy guide, you’ll be able to master the art of sliding knots and design beautiful, unique pieces that can be worn comfortably and adjusted to your preferred length.
To deepen your knowledge, you can search for terms like “sliding knots” or “knots for necklaces” to find a lot of tutorials and inspiration. Watching videos and reading blogs can also help you understand the nuances of this technique and how to apply it to various projects, whether you’re creating simple bracelets or intricate jewellery.
Understanding the Basics and Preparing to Create
Before diving into the creation process, it’s important to grasp the basics of knot-tying and prepare your materials. A sliding knot is created by wrapping and pulling the cord in a specific way that allows the knot to slide along the cord, making the necklace or bracelet adjustable. A sliding knot can move freely along the length of a cord or rope to adjust its size or tension, but grips securely when under load. The primary characteristic of the sliding knot is its ability to create an adjustable loop or connection point. There are many types of knots used in jewellery making, but the sliding knot stands out for its ease and practicality.
Start by measuring and cutting your cord to the desired length. Keep in mind the type of knot you plan to tie, as this will influence how much cord you need. Gather all your materials, including your chosen cord—whether leather, satin, or another material—along with beads or other embellishments you want to incorporate. Select a comfortable, well-lit workspace where you can focus without distractions.
Pay attention to the details of your project: note the length and type of cord, the style of the knot you want to create, and any special features you want to include. Engaging with the jewellery making community by commenting on blogs or social media posts can provide additional inspiration and helpful tips. Before you start, carefully check your cord for any errors or damage that might affect the final product.
The Step-by-Step Process
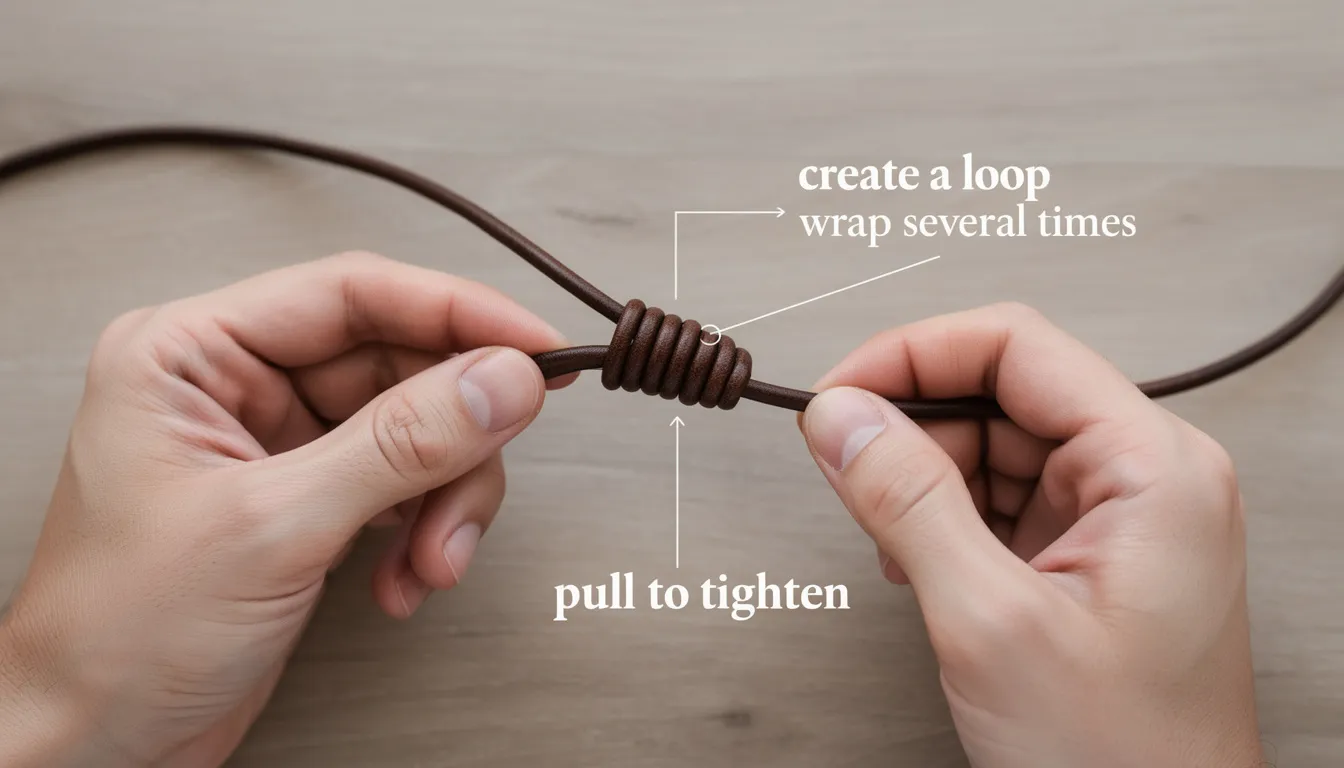
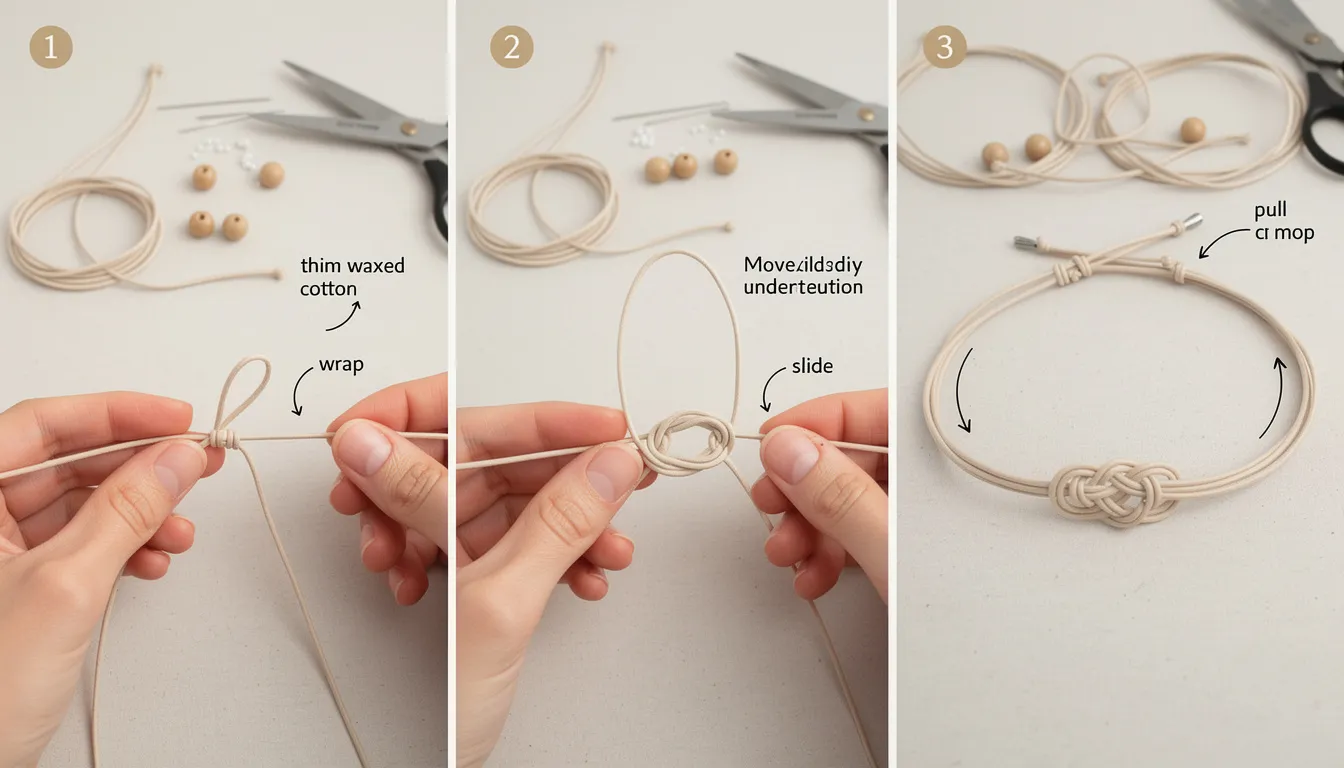
Tying a sliding knot involves a few simple steps that you can master with practise. Begin by creating a loop with your cord, then wrap one end of the cord around the other multiple times before pulling it tight to form the knot. To tie a sliding knot, take the end of one cord and wrap it around the other cord, looping it back to the left. Watching a video tutorial can be incredibly helpful to visualise the process and ensure you’re wrapping and pulling the cord correctly.
Practise tying the knot several times to build confidence and make sure the knot slides smoothly without falling apart. After wrapping the first cord around the second, push the end of the first cord underneath the loops and pull tight. Supplement your learning by reading posts or articles that offer tips and tricks for perfecting the technique. Searching for “sliding knot tutorial” or “how to tie a sliding knot” will lead you to a variety of resources to support your practise.
Tips and Tricks
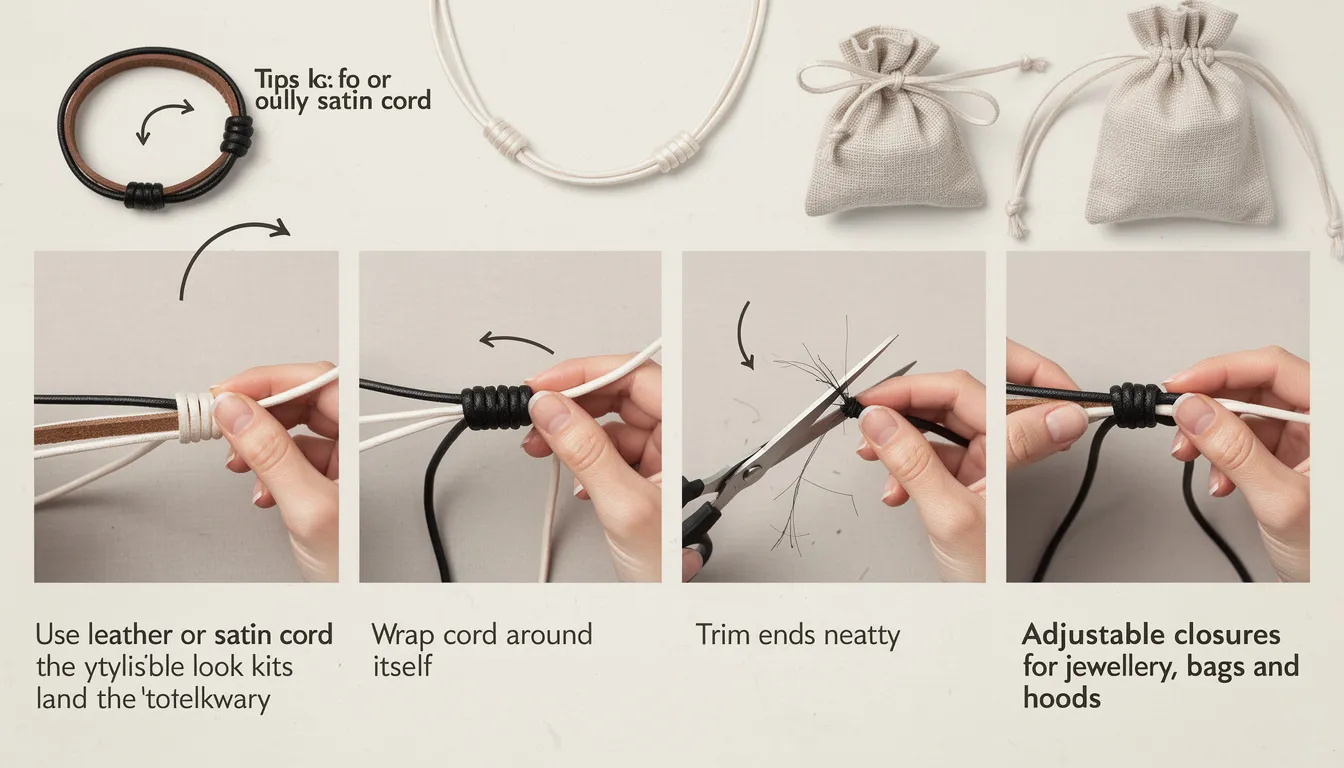
To create a polished and durable piece, consider using leather or satin cords, which add a unique and stylish touch to your jewellery. Sliding knots can add a clean and textured look to jewellery designs, enhancing their aesthetic appeal. After tying your sliding knot, trim the ends of your cord neatly to prevent fraying and give your project a clean finish. Always pull the knot tight to ensure it is secure and won’t come undone while being worn. Beyond jewellery, the sliding knot is commonly used for creating adjustable closures on bags or hoods, allowing users to easily tighten or loosen openings as needed.
Wrapping the cord around itself several times can help create a neat, tidy knot that slides smoothly. When you deliver your finished project, you can do so with confidence, knowing you’ve crafted something both beautiful and functional.
Common Mistakes to Avoid
Even experienced makers can fall into common pitfalls when tying sliding knots. Avoid errors such as pulling the cord too tight or too loose, which can affect the knot’s ability to slide properly. Always measure your cord before cutting to ensure you have enough length for your design. Sliding knots like the Prusik or Blake's Hitch are essential safety tools for climbing, as they grip under load but can be manually adjusted when unloaded, showcasing their importance in outdoor and safety applications.
Pay close attention to details like the type of cord and bead sizes to make sure they work well together. Rushing through the process can lead to mistakes, so take your time and check your work frequently to catch any issues early on.
Advanced Techniques
Once you’ve mastered the basic sliding knot, you can explore more complex variations like the double sliding knot or the wrap knot, which add both style and functionality to your pieces. Sliding knots are commonly used in friendship bracelets, showcasing their versatility in various jewellery applications. To create a second sliding knot, pull more of the second cord through to the left and wrap it around the first cord. Experiment with different materials such as leather or wire to create unique textures and effects. Specific sliding knots, like the granny sliding knot or Osaka sliding knot, are used in surgical procedures for high-tension wound closures, demonstrating their utility beyond jewellery making.
Sharing your creations on platforms like Instagram not only helps you connect with other makers but also provides inspiration and feedback. Combining various techniques and materials allows you to create truly inspired jewellery that reflects your personal style. Embrace the learning process and enjoy experimenting with new ideas.
Conclusion and Further Resources on How to Tie
With patience and practise, mastering the art of sliding knots will enable you to create beautiful, unique jewellery pieces that you’ll love to wear and share. Sliding knots are used to tension tent guylines and ridgelines in camping, allowing for quick adjustments. To continue improving your skills, check out online resources such as specialised websites and detailed tutorials. Engaging with the jewellery making community through sharing projects and commenting on posts can provide valuable support and encouragement. Additionally, slider knots in fishing allow weights to slide freely on the main line, increasing bite detection by allowing fish to take bait without feeling resistance immediately.
When your jewellery pieces arrive or when you deliver your finished creations to customers, you can take pride in the accomplishment of having created something special with your own hands. By dedicating time to learn and master sliding knots, you’ll open up a world of creative possibilities and be able to design stunning pieces that stand out for their craftsmanship and style.
Frequently Asked Questions (FAQs)
What is a sliding knot?
A sliding knot is a type of adjustable knot commonly used in jewellery making to create flexible closures for necklaces and bracelets. It allows the wearer to easily adjust the length of the cord without needing a clasp, making it both practical and stylish.
How do I tie a sliding knot?
To tie a sliding knot, start by overlapping the two ends of your cord. Take one end and wrap it around the other cord two to three times, then thread it back through the loops you created and pull tight. Repeat the same process with the other end to create a second sliding knot. This allows the knots to slide along the cord, adjusting the length.
What materials work best for sliding knots?
Sliding knots work best with flexible cords such as leather, satin, nylon, or waxed cotton. These materials provide enough grip for the knot to hold securely while still allowing smooth sliding adjustments.
Can sliding knots be used for bracelets as well as necklaces?
Yes, sliding knots are highly versatile and commonly used for both bracelets and necklaces. They provide a secure, adjustable closure without the need for metal clasps, which is especially popular in casual and bohemian-style jewellery.
Are sliding knots durable?
When tied correctly and used with appropriate cord materials, sliding knots are quite durable and secure. However, the longevity depends on the quality of the cord and how often the knot is adjusted or subjected to tension.
Can sliding knots be used in other applications besides jewellery?
Absolutely! Sliding knots are also used in camping to adjust tent guylines, in fishing to allow weights to slide freely on lines, and in climbing as safety knots that grip under load but can be adjusted when unloaded.
How do I prevent sliding knots from coming undone?
Ensure you pull the knots tight when tying and trim the cord ends neatly to prevent fraying. Using cords with some texture, like leather or waxed cotton, helps the knot grip better. Avoid pulling the knots too loosely to maintain their hold.
Where can I find tutorials or videos on tying sliding knots?
There are many online resources available, including video tutorials on platforms like YouTube and detailed step-by-step guides on jewellery making websites. Searching for terms like “how to tie a sliding knot” or “sliding knot tutorial” will provide numerous helpful results.
Can I purchase jewellery with sliding knots?
Yes, many jewellery designers and retailers offer necklaces and bracelets featuring sliding knots. These pieces are popular for their adjustable fit and minimalist design. You can find them in stores or online, often customizable to your preferred length and style.
How long does it take to learn to tie a sliding knot?
With practice, most people can learn to tie a basic sliding knot within a few minutes. Mastery comes with repetition and experimenting with different cords and knot variations. Watching tutorials and practicing regularly helps build confidence quickly.
Leave a comment